a solution for issues with svg in plasticity 3D
If you've ever imported an SVG from Illustrator into a 3D app like Plasticity only to be met with error messages halfway into modeling what you've envisioned, you're not alone. The translation from Illustrator's path logic into usable NURBS geometry in a CAD tool is, at best, temperamental. As a result I've spent a lot of time manually editing SVG files in order to get successful topology, especially when working with type-based elements. This article breaks down why this happens, what I used to do to fix it, and the micro app I built to streamline the process.
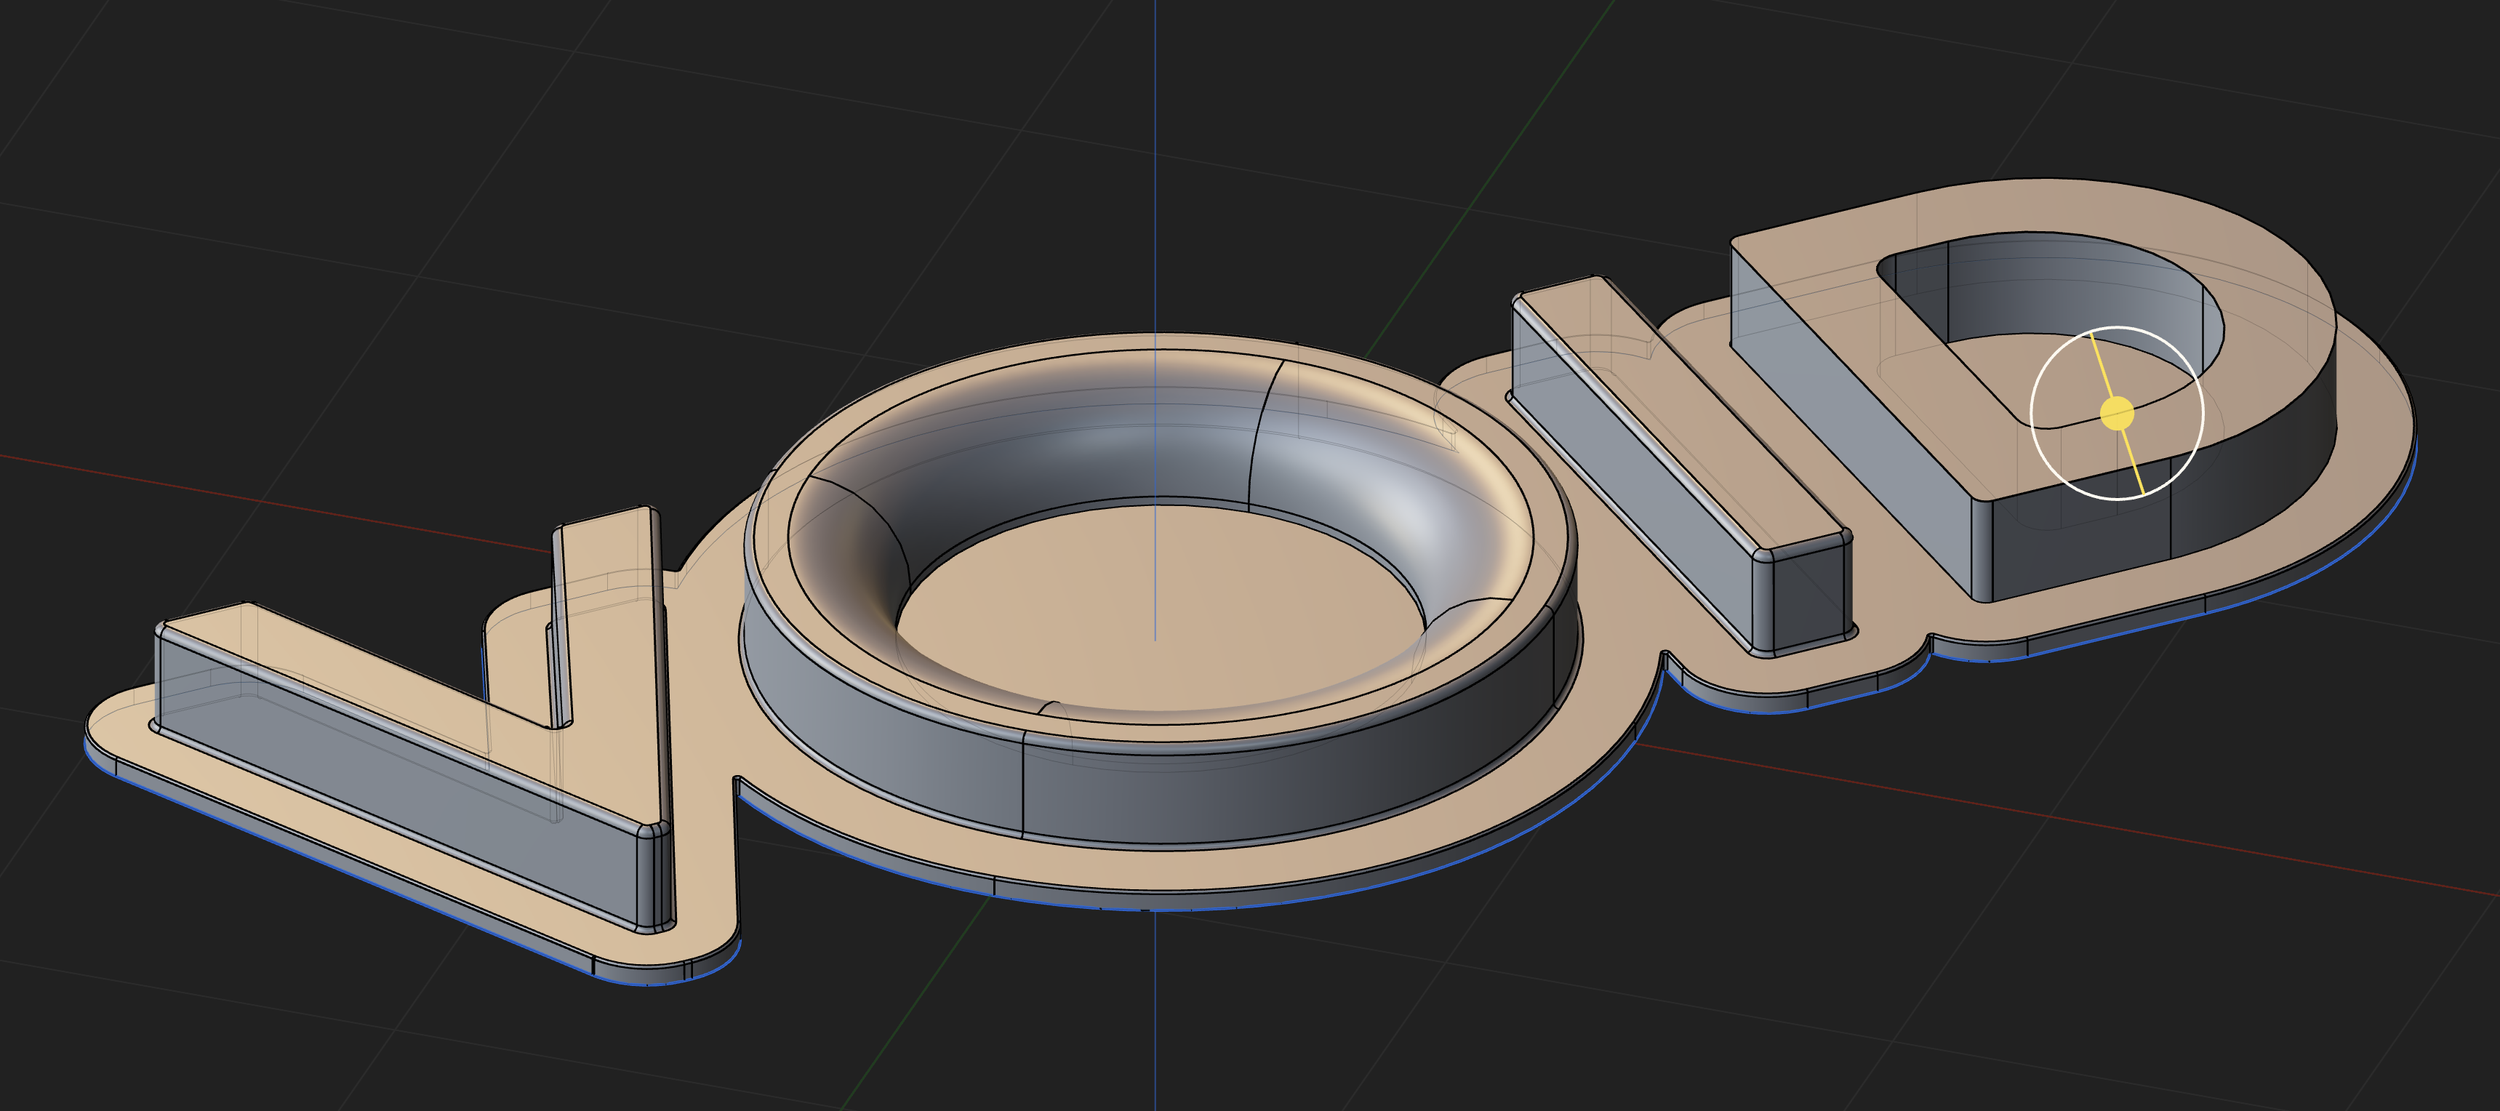
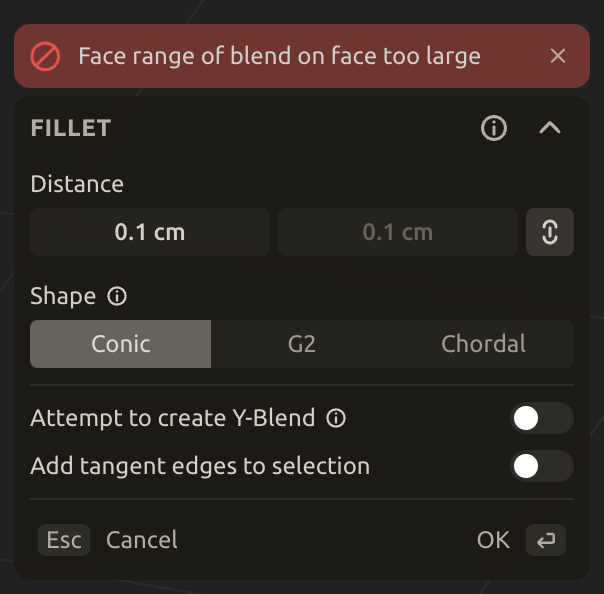
This model was going fine until I started shaping the “D.” (that’s what GPT said! huehuehue) I get an error when adding a fillet on the D - which worked fine on the other edges in this composition.
The Problem: Plasticity may import the SVG, but errors surface eventually
Illustrator is fantastic for creating clean vector art, but it embeds extra data when exporting SVGs: things like <style>, <desc>, <metadata>, and unnecessary nested groups. These are harmless (and often very useful) in a web browser, but wreak havoc in 3D apps expecting lean geometry definitions. Plasticity in particular struggles with path constructs that include unnecessary markup like this, as well as overlapping shapes, stroke treatments, or compound paths.
For example, try exporting any character set in a geometric sans-serif and converted to outline. Even if the paths look pristine in Illustrator, the resulting SVG might import into Plasticity with overlapping curves or broken continuity in places that are basically invisible. What looks like a closed path in Illustrator may be interpreted as a collection of unrelated subpaths by Plasticity, depending on how the SVG is generated. And that’s just the tip of the iceberg.
There’s some tricks to fix what’s happening in this example, but they all involve rewinding a bit and it’s all a bit cumbersome.
Let’s take a look at the markup for the failed SVG above.
<?xml version="1.0" encoding="UTF-8"?>
<svg id="b" data-name="Layer 2" xmlns="http://www.w3.org/2000/svg" width="539.05" height="488.269" viewBox="0 0 539.05 488.269">
  <g id="c" data-name="Layer 1">
    <g>
      <path d="M256.199,162.278c-66.363,0-119.124,53.423-119.124,119.79s52.761,119.124,119.124,119.124,119.457-52.761,119.457-119.124-53.092-119.79-119.457-119.79ZM256.199,358.052c-41.809,0-75.986-34.177-75.986-75.984s34.177-76.653,75.986-76.653,76.321,34.841,76.321,76.653-34.51,75.984-76.321,75.984Z"/>
      <path d="M362.63,81.464h22.281c2.513,0,4.553,2.04,4.553,4.553v158.611c0,2.513-2.04,4.553-4.553,4.553h-22.282c-2.512,0-4.551-2.039-4.551-4.551V86.017c0-2.513,2.04-4.553,4.553-4.553Z" transform="translate(-7.426 312.717) rotate(-45)"/>
      <path d="M514.462,24.291c-32.528-32.528-85.895-32.359-118.592.338l-40.153,40.153c-1.684,1.684-1.684,4.415,0,6.099l112.325,112.325c1.771,1.771,4.668,1.771,6.439,0l39.983-39.983c32.697-32.697,32.868-86.063-.001-118.932ZM491.762,124.586l-12.658,12.658c-3.676,3.676-9.636,3.676-13.312,0l-64.112-64.112c-3.676-3.676-3.676-9.636,0-13.312l11.813-11.813c21.262-21.262,55.858-21.771,77.269-.658,22.511,22.199,23.131,55.107,1,77.238Z"/>
      <path d="M115.337,313.972c-1.185-3.218-4.744-4.066-7.285-1.525l-17.281,17.281c-1.525,1.525-1.525,3.558-1.016,4.744l39.283,102.665c.232.607.086,1.295-.374,1.755l-.732.732c-.46.46-1.147.606-1.755.374l-102.665-39.283c-1.187-.508-3.22-.508-4.744,1.016l-17.281,17.281c-2.541,2.541-1.694,6.1,1.525,7.285l166.369,61.668c1.525.508,3.221.509,4.745-1.015l1.695-1.695c1.525-1.525,1.522-3.219,1.014-4.744l-61.498-166.539Z"/>
    </g>
  </g>
</svg>
The first few times this happened, I searched for any help I could find on forums, reddit, etc. Eventually I asked GPT for some help. There were several solutions to try, and some of them worked - sometimes. The most effective solutions seemed to revolve around optimizing the markup inside the SVG.
Here’s the same SVG with some adjustments to the markup
<svg data-name="Layer 2" xmlns="http://www.w3.org/2000/svg" width="539.05" height="488.269" viewBox="0 0 539.05 488.269"><g data-name="Layer 1"><path d="M256.199,162.278c-66.363,0-119.124,53.423-119.124,119.79s52.761,119.124,119.124,119.124,119.457-52.761,119.457-119.124-53.092-119.79-119.457-119.79ZM256.199,358.052c-41.809,0-75.986-34.177-75.986-75.984s34.177-76.653,75.986-76.653,76.321,34.841,76.321,76.653-34.51,75.984-76.321,75.984Z"/><path d="M362.63,81.464h22.281c2.513,0,4.553,2.04,4.553,4.553v158.611c0,2.513-2.04,4.553-4.553,4.553h-22.282c-2.512,0-4.551-2.039-4.551-4.551V86.017c0-2.513,2.04-4.553,4.553-4.553Z" transform="translate(-7.426 312.717) rotate(-45)"/><path d="M514.462,24.291c-32.528-32.528-85.895-32.359-118.592.338l-40.153,40.153c-1.684,1.684-1.684,4.415,0,6.099l112.325,112.325c1.771,1.771,4.668,1.771,6.439,0l39.983-39.983c32.697-32.697,32.868-86.063-.001-118.932ZM491.762,124.586l-12.658,12.658c-3.676,3.676-9.636,3.676-13.312,0l-64.112-64.112c-3.676-3.676-3.676-9.636,0-13.312l11.813-11.813c21.262-21.262,55.858-21.771,77.269-.658,22.511,22.199,23.131,55.107,1,77.238Z"/><path d="M115.337,313.972c-1.185-3.218-4.744-4.066-7.285-1.525l-17.281,17.281c-1.525,1.525-1.525,3.558-1.016,4.744l39.283,102.665c.232.607.086,1.295-.374,1.755l-.732.732c-.46.46-1.147.606-1.755.374l-102.665-39.283c-1.187-.508-3.22-.508-4.744,1.016l-17.281,17.281c-2.541,2.541-1.694,6.1,1.525,7.285l166.369,61.668c1.525.508,3.221.509,4.745-1.015l1.695-1.695c1.525-1.525,1.522-3.219,1.014-4.744l-61.498-166.539Z"/></g></svg>
There’s a number of things happening here, but simply put: the markup is cleaned up. GPT removed problematic elements Plasticity doesn’t need, and can end up corrupting the curve that is generated. When I import the new SVG into Plasticity and try modeling the shapes I have in mind, I am able to do so without errors.
It doesn’t always work perfectly, but ever since I started doing this (and eventually doing it manually) I was getting far fewer error messages from Plasticity.
Problems with this workflow
This is something that can, and should be, automated.
Every time I do this manually, it opens up the possibility of introducing human error.
If I haven’t done this in a few weeks, I have to go back to my notes and try to remember how I did it the last time, or call up the thread in GPT. This could result in a few rounds of trial and error. More time lost.
Setting Up Illustrator for Success
Let me be clear: I tried every possible export method from Illustrator. “Save As” SVG, “Export As” SVG, copying the SVG code via “SVG Code” export. Every route I took, Illustrator embedded extra markup that broke something when I imported the file into Plasticity.
The core issue is that Illustrator wasn’t built with CAD workflows in mind, and Adobe has not created a preset for this kind of SVG generation. Illustrator is a 2D graphics tool with a visual mindset—not a geometry pipeline. So even if your illustration looks correct, it might be constructed with any number of problematic elements that confuse downstream geometry interpreters.
Preparing Illustrator artwork for SVG export into Plasticity:
Check your work repeatedly. Toggle between outline view and standard view with ⌘Y. This lets you spot clipping paths or shapes that need simplification before exporting.
Paths only. Forget colors and strokes because Plasticity ignores them. You're importing curves, nothing more. I design in black and white, fills only, when preparing curves for use in Plasticity.
Flatten, expand, etc. Expand appearance on transformed objects. If a stroke you created is representative of an area you want to extrude in 3D, outline that stroke. Ungroup everything. Use Pathfinder > Unite wherever needed.
Check for closed paths. Things that look connected may not be - paths should resolve as an outline of a shape.
Avoid masks and clipping paths. These always cause issues. Convert everything to simple, clean paths.
Unfortunately, that’s still not enough.
Even when following these best practices, Illustrator will still inject metadata, style tags, group IDs, and other things that Plasticity doesn’t need, and often doesn’t handle well. The import may look fine in Plasticity at first, but the real trouble shows up when you try to fillet or extrude the resulting curvatures.
The Manual Fix: GPT Suggested Edits
Before importing the SVG into Plasticity, I started doing these fixes with GPT's help. I'd open the SVG with TextEdit, paste the raw SVG code in a prompt and ask GPT to remove all metadata, simplify group nesting, convert styles to inline attributes, and ensure path continuity. Sometimes it worked great, other times I had to struggle with other workarounds.
Sometimes, even after all of this, the curve in Plasticity would still produce errors with fillet or extrude operations. One fix I found to work in some cases was to offset the curve by a very small degree and work from the offset version. Even then, this lacks precision, and is a lot of steps just to get a clean curve.
"Just trace the shape using Plasticity’s curve tools."
This isn’t a serious option, especially for typographic design. The subtle nature of curves in fonts makes it extremely obvious when lettering is rebuilt manually - even in 2D executions. If you work with type every day, you already know this. Sure, you can try to use Plasticity’s curve tools to delineate the complex curvature of each letter in your design, but there will be issues, it takes much longer, and the quality will not be as good.

SVGclean is a free, open-source utility designed to meet the specific needs of importing Illustrator vector art into Plasticity. No login, no cookies, no Google Analytics. Just a clean tool with a minimalist UI and Plasticity-safe presets enabled by default.
It’s built from a fork of the popular SVGOMG project - a powerful app for web designers. Where SVGOMG is focused on reducing the file size of SVG, SVGclean is designed to strip out all the web-specific markup Illustrator generates, that cause issues in 3D workflows.
Upload, paste, or drag in your SVG, and instantly download a cleaned version that behaves better in apps like Plasticity, Blender or Cinema4D.
How to Use SVGclean
Export your artwork from Illustrator as an SVG file.
Upload or drag your SVG file into SVGclean.
The app instantly cleans and simplifies your paths.
Click download (or copy markup to clipboard) to save your Plasticity-ready SVG.
Import your cleaned SVG into Plasticity and start modeling.
That’s it. The default settings are already set, so all you have to do is upload the SVG, download it from the app and import into Plasticity.
SVGclean is very new and as of the time of writing this article, only tested by one person: me. It works well for the things I’ve been building, but it’s not guaranteed to be perfect in every case. If you hit a snag or have suggestions, I’d love to hear them. This is a tool by a designer who happens to work in 3D, for other designers.
If it saves you even two minutes, I’ll still call it a win, because every second counts when it comes to residual attention and creative momentum.
Give it a try, and let me know what you think.